AMSA
Activity 2: Creating our own htop!
Please read everything carefully! The only part you may skip is Section 5, which explains the PRAC-2.1, PRAC-2.2, and PRAC-2.3 tasks (so, if you’re working on PRAC-2.1, you can skip the instructions for PRAC-2.2 and PRAC-2.3).
However, don’t miss the important information that comes after Section 5!
1. Introduction
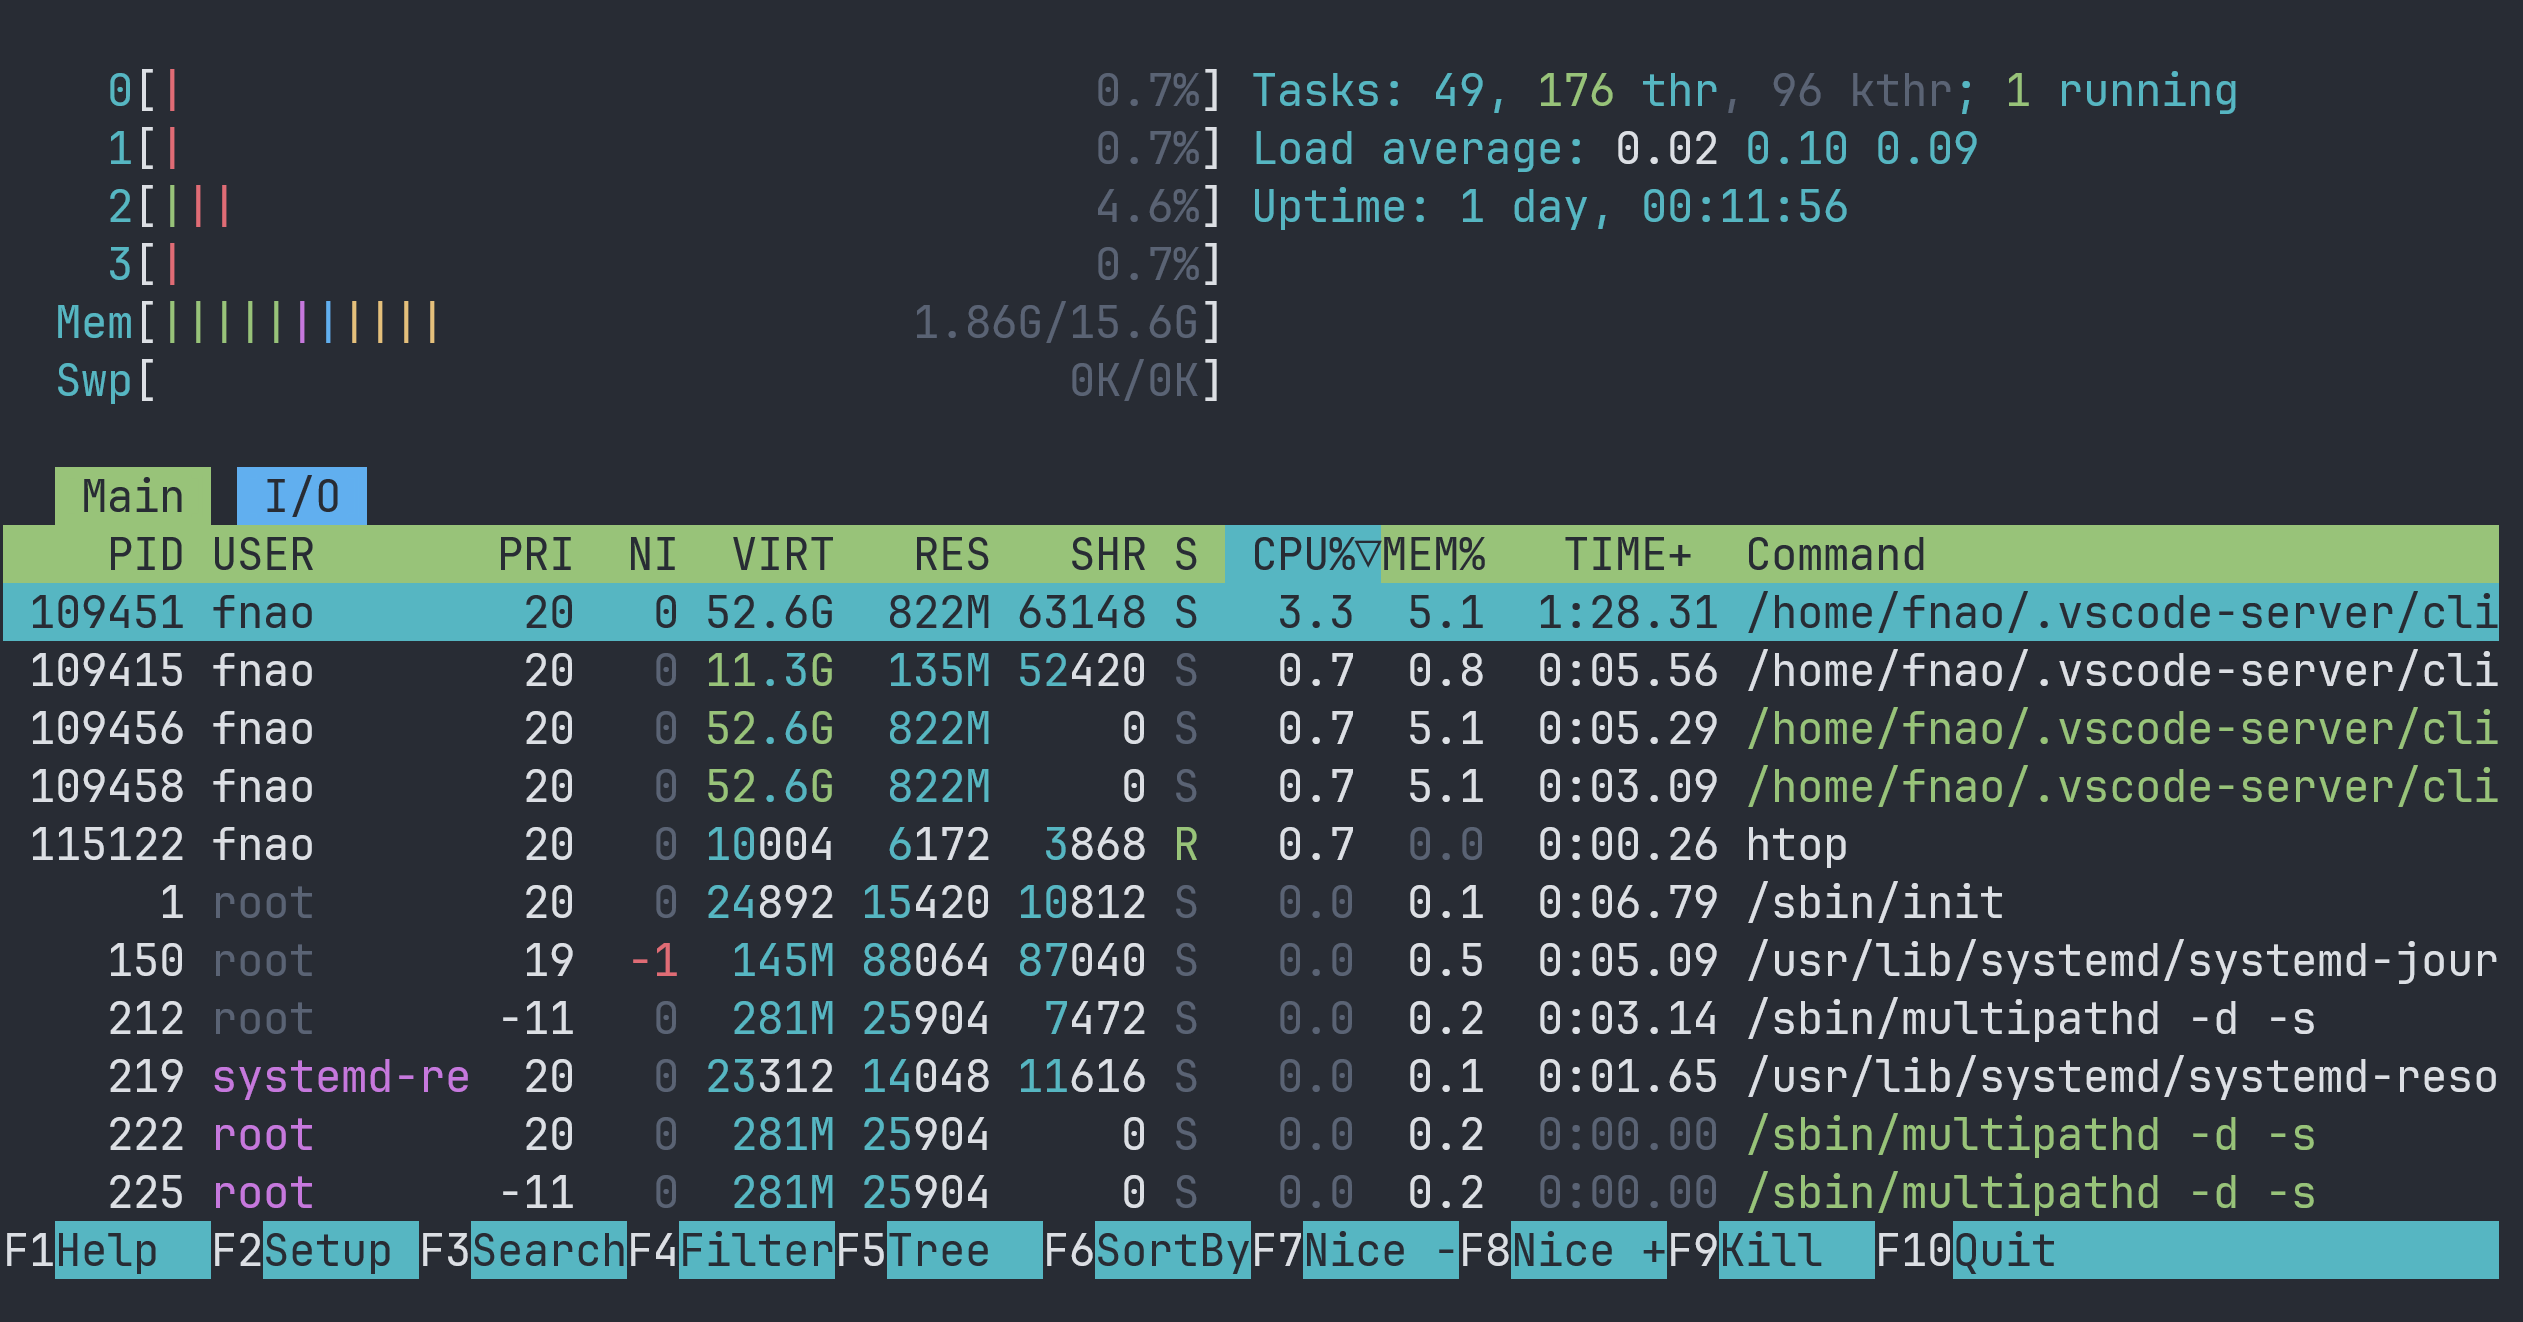
You may have heard about the linux program htop, it is an interactive process viewer for Unix-like systems.
With htop you can:
- See a real-time overview of system processes, CPU cores, memory, and swap usage.
- Scroll and search through processes easily.
- Interactively sort, filter, and kill processes with simple key commands.
- Get a quick sense of system health thanks to its bars and colors.
Below is a screenshot of how it looks:
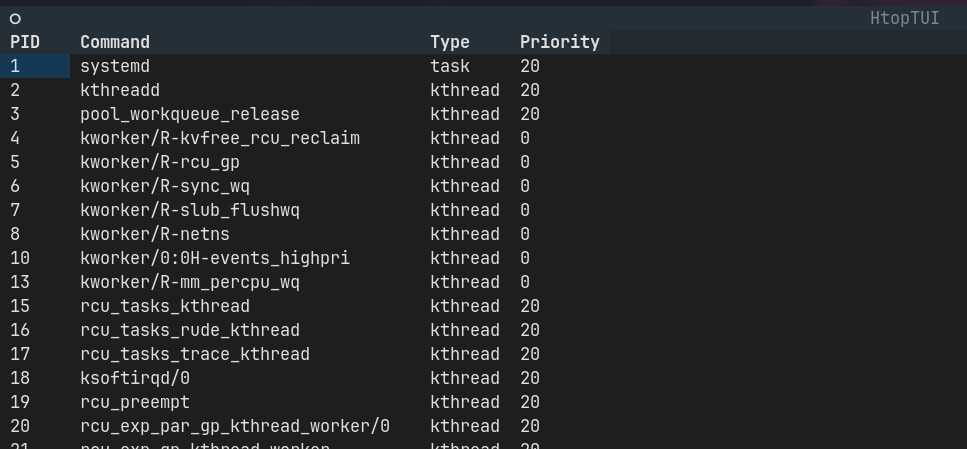
On this activity you are going to build your own simplified version of htop by writing python code that analyzes the contents of /proc. Once finished, it will look like this:
2. Delivery
Accept the assignment in Github Classroom, following the link
To complete this activity, you must do the following for each sub-delivery (PRAC-2.1, 2.2 and 2.3):
Deliver a link to your Github repository on the virtual campus activity.
Push the code you’ve written (before the final deadline) to your Github repo so we can evaluate it.
Remember that we’re only going to evaluate your code after the final deadline, but following the recommended tempos and pushing each part of the activity accordingly can grant you extra points.
3. Outline
This activity is split onto 3 incremental parts, which are going to be related to the contents explained during the different classes.
On the first week, once we have explained syscalls, processes and ProcFS, your job will be to implement a function that retrieves a list of all the system processes.
Next, after having explained process priorities, we’ll want you to get the priority of each of the processes.
Finally, since you’ll understand the SIGHUP signal, the idea is that you also find out which processes are ignoring this signal or not.
4. Resources
Building an entire htop is too big of a task and out of the scope of the subject, even if it is a simplified version. For that reason, the teachers have prepared some resources that will hopefully make the activity shorter and more enjoyable.
amsatop library
A python library available on PyPI has been built with all of our love so that it already implements the UI and some abstractions. Make sure to check out the docs!
Building your solution on top of a library makes it easier to give you useful tools such as tests and helper functions.
Repository template
When you join the Github Classroom activity with the link provided on Step 2, a remote repository is automatically created for you to work on this assignment. This repository will already contain some code, below are the details of what comes with the repo:
- It already has
amsatoplibrary added. - A class
AmsaTopwith a function to be implemented for each sub-delivery located onamsatop_solution.py. Here is where we expect you to write your code. - Unit tests we’ve made for you to have some guidance (which are not exactly the same tests we’re going to use to evaluate your project but they will be similar). Passing the provided tests on the Ubuntu VM is a very good indicator that you’re doing it right.
- A
README.mdfile where you’ll have instructions on how to run the provided tests and linter, and how to set up the python environment.
5. Tasks
Below is a detailed explanation of what you have to do on each task, but before reading through we want to make something clear:
On each of the following tasks you’ll be obtaining a list of processes and then looking for further information on these processes.
Notice that if I get a list of all the processes currently active on my system, and then I go fetch information on them, it may have happened that one of these processes has ended and its information is no longer available. Your code has to be prepared for this scenario and be prepared to not find any information about a given process because it is no longer running and thus there is nothing for that process inside /proc.
In that case just exclude the process from the returned list. Be aware that some tests already check that, so don’t bother too much.
PRAC-2.1: Getting all processes
Implement the get_processes method so it returns a list where each element is an instance of Process. There has to be an element on the list for each process, thread and kthread running on the system.
This part has to be done exclusively by reading the raw contents of /proc. It is strictly forbidden to use any external libraries or commands.
When creating instances of Process, notice that the field priority can be None. As stated on the docs:
Can be None if unavailable or you’re doing Prac-2.1.
When working on Prac-2.1 just set that field to None.
Make sure to read through the docs of the helper classes and functions, we promise using them will make your life easier 😉!
It is very important that you make use of the property proc_folder of the Htop class when accessing files on "/proc". Do not use a hardcoded string “/proc”, instead use self.proc_folder (which is a string that defaults to “/proc”). This is essential for the tests to work.
Here is an example of what NOT to do:
class Amsatop(Htop):
    def __init__(self):
        super().__init__()

    def get_processes(self) -> List[Process]:
        for entry in os.listdir("/proc"): # Do NOT do it like this ❌
            if ...
Here is an example of what you should do:
Hints about how to get the differents processes/threads/kthreads from /proc.
As stated on the week-2 slides, there are different ways to get information about /proc. We recommend you to use the following ones:
To detect processes or kernel threads, the algorithm is “trivial”, the idea is:
- List the contents of the proc directory, and filter the ones that are digits (pids/tgid).
- Now you have to filter if they’re a process or kernel thread. We recommend you to apply the mask that the htop code applies to the flags content to see if they are a kernel thread 1.
- If it’s a kernel thread, add it to the list and stop analyzing.
- If it’s a process, add it, but be aware that can have threads spawned (next point will explain this).
To detect threads, it’s a little bit more complicated, you should:
- For each detected process, inspect the tasks folder. Be aware that:
- This folder will have, at least, one entry, which should be equal to the pid of the current process.
- If it has more than one entry, it means it has some thread spawned.
- For each detected process, inspect the tasks folder. Be aware that:
Prac-2.2: Adding priorities
Implement get_priorities method so it returns a list of Process. It has to be the same list we obtained on Prac-2.1 but now we want you to set the value of the priority field if available.
There are no hints here…. It should be pretty easy to implement if you already have Prac-2.1 solved.
Play with the nice command so you can see how the priorities change on real time!
It’s normal to see some “strange” priorities on kernel threads!!
Prac-2.3: Filtering where SIGHUP is ignored
Implement the get_hup method so it returns a list of Process. It has to be the same list we obtained on Prac-2.2 (with the priorities) but now we want to add a filter so only those processes that are ignoring the SIGHUP signal are returned, those that are not ignoring it are expected to not be present on the returned list. Be aware that ignoring a signal is not the same as handling a signal.
Hints about detecting signals
One of the files inside the process /proc/{pid} has a SigIgn (signal ignore) field which shows the set of signals the process is currently ignoring. Retrieving this information works in much the same way as checking whether a PID/TID corresponds to a kernel thread (by examining and interpreting bitmasks).
The field SigIgn is represented as an hexadecimal number. Since it has 16 hex Characters, it means it represents 8 bytes (which are 64 bits).
The first 32 bits aren’t used (for future signal extensions), and the last 32 are a bitmap encoding (each one represents one signal).
This means that:
- The last bit corresponds to the first signal. So signal 1 bit is: (0000 0000 0000 0000 0000 0000 0000 00001).
- The second-last bit corresponds to the second signal. So signal 2 bit is: (0000 0000 0000 0000 0000 0000 0000 00010).
- The third-last bit corresponds to the third signal. So signal 3 bit is: (0000 0000 0000 0000 0000 0000 0000 00100).
- Etc.
So, the mask to detect if the Signal N is ignored, has the following formula:
mask(N) = 2^(N-1) -> Where N is the signal number.
So:
- If I want to check if the process ignores the signal number 1, I can apply the (&1) mask (…00000001 on binary)
- If I want to check if the process ignores the signal number 2, I can apply the (&2) mask (…00000010 on binary)
- If I want to check if the process ignores the signal number 3, I can apply the (&4) mask (…00000100 on binary)
- If I want to check if the process ignores the signal number 4, I can apply the (&8) mask (…00001000 on binary)
- Etc.
Be aware that if the result of SIG_IGN & mask:
- Is zero: Means that the signal is not ignored (the mask isn’t matching…).
- Is not equal to zero (technically, it should match the mask): This indicates that the signal is ignored.
Keep in mind that each signal corresponds to a number…
It’s normal to see some kthreads ignoring SIGHUP!! Don’t worry too much about it!
6. Setting the environment up!
Installing libfuse
We use a Linux feature called FUSE in our tests. This lets us emulate the special capabilities of the /proc filesystem without bothering you (the student) with the technical details of our test setup.
For this reason, in the virtual machine’s command line, you must run the following command for the tests to work:
sudo apt update && sudo apt install libfuse2t64Cloning the repository and set it up:
Remember that, once you entered the Github Classroom on section 2, you will have to clone your repository with 2:
git clone <ssh_address_of_your_git_repository>Then, enter inside the folder of the repository and setup a virtual environment for the python project, this will be done with:
uv syncAnd then, you can enable the virtualenv on your current shell (zsh or bash) with:
source .venv/bin/activate Running tests:
You can run all the tests we give to you with the following command (from the project root path):
uv run pytestYou can also run specific test-suites for each prac, for example:
# For prac 2.1:
uv run pytest test/prac_2_1

# For prac 2.2:
uv run pytest test/prac_2_2

# For prac 2.3:
uv run pytest test/prac_2_3
[Optional] Running tests with coverage:
If you want to see if all the lines of your code are covered by the tests (this is usually a good indicator), you can run a test coverage, this will display information about the relationship between your code and our tests! Run:
uv run coverage run -m pytest  -v -s
uv run coverage reportLearn more about pytest options here
7. Evaluation
Your final score will come from various parts:
- The tests we give you are passing on the Ubuntu VM → 50%.
- The linter (ruff) runs without errors → 5%.
- Our tests (you won’t have access to them) are passing on the Ubuntu VM → 25%.
- Best practices are used → 20%.
Keep in mind that the first two items (tests and linter) can be automatically verified using Github Actions on your repository
8. Rules
- No external python libraries can be used, only
amsatopand built-in libraries are allowed (e.gos,typing). - It is forbidden to make python execute a Linux command that will provide the information about processes.
- The process information needed can only be obtained by reading the contents of
/procand parsing it out (remember you have helpers for that). - Make sure the tests are passing on the Ubuntu VM, we’ll pass them on the VM too.
- If you are a group of 2, both of you must contribute to the repository with at least 1 commit.
9. Resources
10. Doubts
Please don’t hesitate to ask the teachers any doubts, there are no dumb questions, we’re here to help.
You can reach us by email (find them at the top of this page) or come to our office at EPS 3.07 (we’re here mostly during mornings).
Footnotes
Remember, that in c, applying a mask would be
/* Not exposed yet. Defined at include/linux/sched.h */
#ifndef PF_KTHREAD
#define PF_KTHREAD 0x00200000
#endif
// More code here...
if (lp->flags & PF_KTHREAD) {
proc->isKernelThread = true;
}
In python, the exact same code would look like this:
↩︎If you don’t have any idea of what we’re talking about, revisit the setting up the VM and brief git summary↩︎